Thursday, June 16, 2011

Robot Day!


Last week I showed you the Summer Bucket List I made with the kids that I nanny and this week I am going to show you our "Robot Day".  This week one of the two kids I nanny was at sleep away camp all week...now what to do with the boy to entertain him all week?  We ended up staying busy with my next door neighbor and her kids but I needed something to do on the day that they couldn't get together.  Every time we go to the library he loves to find the Robot books.  It is the first thing he asks for when we get to the library.  We headed to the library and came home with 4 Robot books... 


We read the Robot books...


 then he drew a Robot picture on a piece of large drawing paper while I got the supplies ready to make our Robot cupcakes. 

Robot Cupcakes...
In my previous entry called Oh, the Joys of Cupcaking I showed you some of the cupcakes I have made from my favorite cupcake book series called Hello Cupcake.  This Robot idea also came from that series.   


 Tomorrow I will post the full tutorial on how to make these cupcakes so check back if you would like to see how to make these step by step. 

Robot Recyclables

 Next we gathered some recyclables... 


and I spray painted them. I'd actually recommend doing this a day ahead of time to allow proper drying time.  Not my best spray paint job for sure but it was HOT and I also had a 5 year old drilling me with questions about the spray painting process!


Then we cut a Pringles can in half which we used as the legs...

and we covered them in tin foil. 


Then we used a blue plastic mini trash can from the Dollar Tree (the only thing I bought for the entire project) and covered the top with poster board and tin foil...


Then we wrapped the base of the trash can in tin foil and I used hot glue to attach the body parts as the 5 year old gave directions about where each part should go. 


Then we added some pom pom buttons, a face using ribbon and googly eyes and added some antenna things with floral wire and pom poms. 


A Great End to Robot Day...


Then we ended the day with Robot sidewalk chalk drawings.  We used some of the Robot books to help us with inspiration. 

This was a huge hit and by far one our best days of summer so far! 

Thursday, June 9, 2011

Summer Bucket List!


Summer Bucket List.  Summer activity lists have been a popular thing featured in blogs and it got me thinking...I've seen them represented in a variety of ways but what about an actual bucket?  As some of you know I'm finishing up my degree to be an elementary school teacher and in the summer I nanny two kids.  We stay busy both for their sanity...and mine!  What better way to get them excited about summer vacation and all the fun summer activities then to have them create a list of things they wanted to accomplish and do this summer.  Some of items are activities but they also set personal goals for themselves such as learning to swim and goals for gymnastics.  My favorite goal (being a teacher)...our goal to read 100 books this summer!  I will share more about this with you later.  What better way for them to monitor their goals then to have them actually visually see the things they have accomplished.  They are SO excited about this! 

   First I picked up two summer sand buckets at Michaels.  I used paint markers to write their name and summer bucket list.  I used some ribbon and craft glue to box in the words.  I didn't include the year so that the buckets could potentially be used again next year. 


  Then I laid out scrapbook stickers for the kids to pick from and put on their bucket.  They used some summer fun stickers and also some of their favorite things (soccer, gymnastics etc.).

Then after the kids attached their stickers, they decorated with colored Sharpies. 


 Then I picked up craft glue and clothes pins...

cut cardstalk (in a variety of colors) to fit (both length and width) the clothes pins.


Then wrote with a thin felt marker the goal/activity and used craft glue to attach it to the clothes pin. 

Then attached the clothespins to the outside rim of the bucket.

As they complete the activities/goals over the summer, they can drop the clothes pins in the bucket.  Then they will have the activities/goals they still need to complete on the outside rim.  

This is one of my new favorite projects for kids.  I even made a small one for myself and included all those tasks that need to be done but I never get around to...organizing recipes, updating i-tunes, backing up digital photos...and the list goes on and on! 

Linking up to these blogs:

Monday, June 6, 2011

Kabob cupcakes! Yes, there IS a cupcake for every theme!

Yesterday I posted a recipe for Marinated Chicken Kabobs that I served at a cookout we hosted this weekend. Well of course I just had to find matching cupcakes to go with it.  There are many different BBQ themed cupcakes but these Kabob ones seemed so fitting given the menu!  Here is how I made them...


You need 24 of your favorite cupcakes.  I used yellow cake since it is my family's favorite with chocolate frosting.  You also need the following ingredients:
Kraft Carmels
Chocolate Frosting
Vanilla Frosting tinted gray with a very small amount of black food coloring
Orange, yellow and red sprinkles
Box of Mike & Ikes
Toothpicks
Cupcake liners (I used the aluminium ones so that it looked more like a "grill")


 First I frosted all the cupcakes with chocolate frosting. 

Then I created a "sprinkle station" on a paper plate.  I had an almost empty red container of sprinkles so rather than have to sprinkle each cupcake with three different jars of sprinkles, I just added a little orange and yellow to the red container so I could just sprinkle with one container. 

 Then I took my vanilla frosting (that was tinted gray with a small amount of black food coloring) and I used an icing bag to go around the edge of each cupcake and then put lines across to make the metal "grill" grid.  *See the final product pic to see the "grill" grid in more detail.
 (Honestly I wasn't thrilled about how my "grill" lines came out.  I should have used my Wilton cake decorator but I ran out of time before our friends were supposed to arrive and had to be quick.  Next time I will be sure to leave more time to do the "grill" lines because I think they really make the cupcakes but that is the way entertaining goes...always too much to prepare and not enough time!)

Lastly I added the "Kabobs" made by skewering pieces of carmel (chicken) and the Mike n Ikes (bell peppers, pineapple & veggies) on a toothpick and then laid one "Kabob" across each "grill". 
There you have it! 

Don't forget to check back tomorrow as I share a cute summer project for kids!

Linking up to these blogs:
http://savvysouthernstyle.blogspot.com/ 

Sunday, June 5, 2011

Marinated Chicken Kabobs

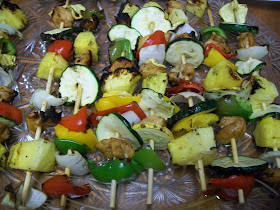
Hope everyone is having a great weekend!  Last night, my boyfriend and I had my friend Staci and her fiance Matt over for a little summer cookout.  We wanted to having something a little different from the traditional hamburgers and hot dogs.  We decided to make chicken and veggie kabobs using a Paula Dean marinade recipe.  It was super easy to make and tasted delicious! 

Ready for the recipe?...

Ingredients:   2 tablespoons of the following:   Olive oil, soy sauce (I used lower sodium), teriyaki sauce, worcestershire sauce.  
  2 cloves of minced garlic
Juice from one whole lemon
Chicken breast diced
Wooden skewers soaked in water (to help the skewers from burning)


First mix all the ingredients except the chicken in a bowl and stir well.  Then add the chicken and mix well so all the pieces are covered in liquid. (I put mine in a container with a lid so that I could shake it up and make sure all the chicken was covered.)  Let it marinade for at least an hour but the longer the better.  While the chicken is marinating cut up a variety of your favorite veggies and pineapple!  We used onion, pineapple, zucchini, green, red & yellow bell pepper and yellow squash.  Many people also use mushrooms but we don't care for them! 


Now the fun part!  After letting the chicken marinade for awhile you get to build your skewers.  A few tips that you might find helpful:
Allow a little space in between each item on the skewer so that the heat can get to all sides and evenly cook. 
Don't eat any raw veggies as you are skewering because of the raw chicken.  The grill will burn off any uncooked chicken from the veggies so they will be safe to eat once cooked.
Don't cut your veggies to thin or your chicken to thick because the veggies will burn before the chicken is cooked all the way.    


 I ended up with a lot of leftover veggies so I threw them into foil packs with a little pepper and olive oil.  Put the foil packs and skewers on the grill and cook until the chicken is cooked all the way through. 


Yum!  I'm not a big meat eater and I'm VERY picky when it comes to meat but this was delicious!  A perfect alternative to the traditional hamburger and hot dog.

Tomorrow I will share with you my special dessert...Kabob cupcakes!  Check back tomorrow for this cute and easy cupcakes!   A little later in the week I will share the recipe for the side dish I made. 


Thursday, June 2, 2011

Simple and cheap but nothing fancy $5 greenery piece

My boyfriend Dan is currently building a house which is exciting stuff!  I'm particularly excited because of the decorating opportunities this brings AND I'm getting a craft room!!  I haven't decided if he is being nice by giving me the craft room or if he is just tired of having my "craft crap" all over the living room.  Either way, I am so excited!  I have a few craft room projects to show you in the coming weeks but for now I will show you how to make this cheap greenery piece that you can use in a variety of spaces.   


Materials:   Variety of greenery ($1 per bunch from the Dollar Tree)...about 3-4 bunches, 1 green Styrofoam block ($1 from DT), and 1 gold planter tin ($1 from DT)


 First I cut down the Styrofoam block to fit tightly inside the tin. 

 Then I began adding greenery.  I arranged mine in the diagonal position because I wanted the display mine with the corner as the "front".  


I put the long tall branches around the outside and then filled in the middle until all the Styrofoam was covered.  I could have used some dried moss and hot glue to cover the Styrofoam prior to putting the greenery in but I was able to fill it in enough that you can't see the Styrofoam through the greenery. 

Perfect for a kitchen counter...
or a living room end table.  Total cost $5! 

My boyfriend and I are hosting a cookout this weekend so I will have some great cookout recipes and a very fun dessert to share with you soon!